Stop losing customers to complex choices. Boost your conversion rates with the WooCommerce 3D product configurator, integrated seamlessly. Give your customers the confidence to buy by showing them exactly what they’ll get.
WordPress and WooCommerce 3D product configurator
±15 minutes. No commitment. Just answers about your WooCommerce store. ±15 minutes. No commitment.
✓ Native WooCommerce plugin
✓ No redirects or external configurator
✓ Used by WooCommerce stores worldwide
+30%
Higher Conversion Rates
+40%
Higher Average Order Value
50%
Faster Sales Process
100%
Fewer Order Errors
Everything you need to sell Configurable Products with WooCommerce
Add the WooCommerce 3D product configuratior and CPQ software so your customers can visualize products before they buy.

Native WooCommerce plugin
Installs directly as a native WooCommerce plugin in WordPress. Expivi runs directly on your WooCommerce product pages without redirects or external tools. The ideal solution for stores looking for a WooCommerce 3D product configurator.

No developer required
Configure complex product rules, pricing logic, and 3D assets directly in Expivi’s platform. Your team can manage product configurations and updates without custom development. No developers or external agencies required for day-to-day changes.

Real-time 3D Configuration
Let customers configure and visualize products in real-time before adding them to cart. Our 3D product configurator for WooCommerce helps shoppers understand complex product options instantly. This leads to higher purchase confidence and fewer returns.
Automatic data insights
Every product configuration automatically generates accurate pricing, specs, and production data. No manual handoff between sales and production teams. Reduce mistakes and streamline your sales process.
Advanced Visual CPQ
Handle complex pricing rules, product logic, and advanced configurations. Expivi delivers enterprise-level CPQ functionality without the cost or complexity of traditional systems. Perfect for growing WooCommerce stores.
Design-to-Print automation
Automatically generate production-ready files from customer configurations. Customers customize products online while Expivi prepares the correct production data. A powerful WordPress 3D product configurator plugin for personalized products.
Free ±15 minute walkthrough tailored to your product catalog.
Trusted by companies worldwide


WooCommerce 3D product configurator supported features
- Augmented Reality
- Presets for multiple configuration entry points
- Complex pricing engine
- PDF quote generation
- Save & Share design
- Print ready output
- Custom configurator styling
- Multi Language and currency
- Google Analytics/ Tag Manager compatible
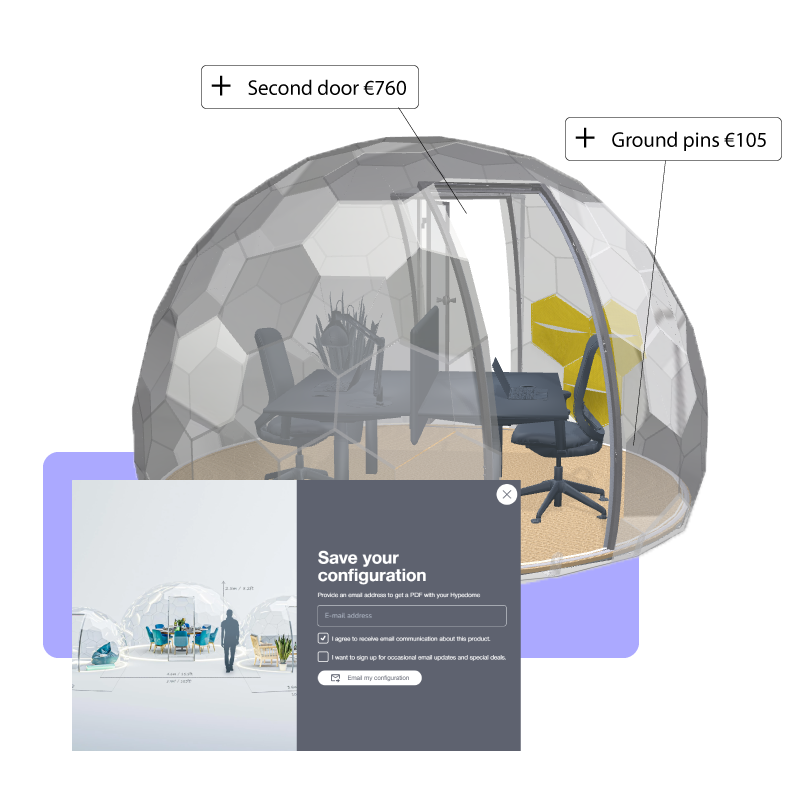
Hypedome: automatically generate quotes to increase sales and reduce costs
Hypedome, a prominent garden dome manufacturer, encountered difficulties in delivering an immersive customer experience and optimizing their sales process. Conventional methods of visualizing products and manual quoting procedures proved to be time-consuming and prone to errors.
Customers were inundated with numerous options, making it challenging for them to determine which ones aligned with their specific dome requirements. Consequently, this led to increased customer service costs and a slower sales process than desired.
Want to know more?
Schedule a 15 minute discovery call with our team to talk about your challenge or ambition, and find out how we can help you grow.